What to expect after a hard reset or battery shutdown
SELECTRONIC
If the SP PRO is shut down and restarted using the shutdown procedure, it will no longer remember the system’s state of charge. By default, it resets to 85%, and the lights on the battery indicator panel on the front of the unit will flash until it completes a recalibration charge.
- If the unit was restarted after the batteries discharged very low, please manually run your generator for several hours to help the recalibration.
How to start your generator
| Before attempting to start the generator: check that it has fuel, and that nobody is working on the generator, and that the switch on the generator is set to AUTO. On larger generators the AUTO light will be lit on the controller, or the screen will show AUTO mode. Smaller generators often have a 2-wire / Remote start / ATS setting on the key, and some also have a switch that enables this. |
SELECTRONIC
- Go to your SP PRO and press and hold the Generator button until it beeps.
- The button will start to flash green.
- Your generator should start within about 30 seconds.
VICTRON
You can start the generator on the screen at your inverter system, or from your phone or computer.
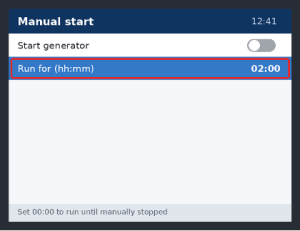
| Option 1: On the CCGX screen | Option 2: From your phone or computer |
 |
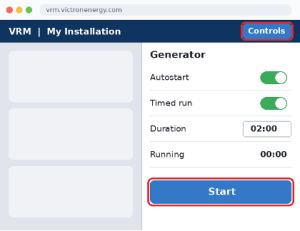 |
| 1. Open the Main menu and select Generator start/stop. 2. Select Manual start. 3. Set Run for to how long you want, e.g. 02:00 = 2 hours. 4. Switch Start generator to ON. It starts after a 5-second countdown. To stop: switch Start generator to OFF. | 1. Log in at vrm.victronenergy.com or in the VRM app and open your installation. 2. Click Controls (top right). 3. Under Generator, turn on Timed run and set the Duration. 4. Press Start. To stop: press Stop in the same panel. |
| Remember: always set a run time so the generator stops by itself. Leave Auto start ON so the system can start the generator when the batteries are low. If the generator keeps running after you stop it, the batteries are low and it will stop once they’re charged. |
How to know if the generator is charging the batteries
SELECTRONIC
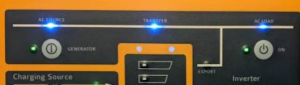
The AC Source light on the front of the SP PRO will turn blue, and the Transfer light will light up as well.
VICTRON
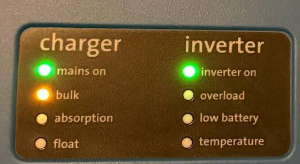
On your MultiPlus or Quattro, the LED status lights tell you whether the unit has accepted your generator’s power or is rejecting it due to poor power quality. Normal charging (solid LEDs) When your generator is running smoothly and providing clean power, the internal transfer switch activates and the LEDs stay solid:
- Mains On: the AC input from the generator is fully accepted.
- Bulk: the unit is pushing maximum current from the generator into your batteries.
- Absorption: the batteries are nearly full; voltage is held constant while current tapers.
- Float: the batteries are fully charged; the generator is just maintaining them.
Generator running but not charging the batteries
First, check the switches- Check the generator’s circuit breaker is up (position 1). On smaller generators this may be a small switch. Larger ones have a normal circuit breaker like the ones in your switchboard, sometimes behind the door where the controller is.
- Check the Generator AC Isolator next to your generator is turned on (not all systems have one).
- Check the switch labelled Generator in the main AC switchboard is up.
SELECTRONIC
The blue AC Source light comes on, but the transfer light doesn’t The blue AC Source light means the inverter can see the power from your generator. The Transfer light stays off because the inverter is waiting for that power to become steady and clean. Until the generator’s power is within the right limits, the inverter stays disconnected to protect your home.
VICTRON
The Mains On light keeps coming on and off The inverter can see the generator but isn’t accepting charge from it. The clicking you hear is the MultiPlus or Quattro trying to connect to the generator. As soon as it connects, it detects a problem with the generator’s power and disconnects (clicks off) to protect your system and appliances. It then waits a few seconds and tries again, and can get stuck in this loop. Common reasons for this
- The generator is getting bogged down: when the MultiPlus or Quattro connects, it asks for a lot of power at once. If the generator can’t handle the sudden load, its voltage drops and the inverter disconnects.
- “Dirty” power: portable generators often have fluctuating speeds. If the frequency varies too much, the MultiPlus or Quattro will reject it.
- Eco mode is on: if the generator is idling low to save fuel, it can’t react fast enough when the inverter draws power. This is only found on smaller generators and should always be turned off.
- Check for build-up on or around the generator (mud wasp nests, birds, rodents).
- Change the oil and filters.
- Make sure the generator has enough airflow.
- Have it professionally serviced.
- Arrange a service visit. We can sometimes solve problems remotely by logging on to the remote monitoring platform.
| WARNING Never run the generator in an enclosed space (carbon monoxide). If you see smoke, smell fuel or hear strange noises, turn it off at the generator and call your installer. |